
Programming a Neopixel Pride Flag
July 08, 2018Some weeks ago, I had an instance in which I was planning to do in person volunteer recruitment for Freedom for All Massachusetts. Now, this is very different from canvassing, as I found out about when I was at Pride. There is no “hide your politics for a bit because we need accurate information”, this is “assume everyone you talk to is on our side because we’re trying to recruit them to help us”.

So, what better way for me to show my pride, and be a techie, than to have a batch of LEDs rotating between the pride flags that I care most about?
Enter neopixels and an ATTiny86, in the form of an Adafruit Trinket. This is my first significant hardware project that involves both wiring and programming.
I started out with a neopixel RGBW jewel, but I was never able to get the signalling to work. Lacking any better ideas, I dropped back to a bunch of 8mm through-hole RGB neopixels and programmed for that. More on the problem later, but I think the programming library I was using does not actually signal RGBW neopixels correctly.
While it took a great many hours, mostly in setting up my environment and then getting the hang of very low level C programming, I did eventually succeed. But on a breadboard with long jumper wires. Still, proof of concept, and I’ll get a neopixel RGB jewel later to finish out the project.
All of the code for this project is in the pride-trinket github project.
AVR Builds

First, I need a build environment. I am not using Adafruit’s development environment because I expect to pretty quickly go beyond the idea of a single tiny microcontroller, a microcontroller that Adafruit packaged and shipped. I’m already planning to go beyond Adafruit’s offerings, though their products are very nice.
For every AVR project, you need three things:
- AVR binutils
- Libc built for AVR
- A GCC that targets AVR
I discovered bugs in the libc and GCC builds in my Nix repository, so I patched against those bugs and then repackaged all three packages for safety.
avrbinutils has warnings that cause the build to error, so I replaced the build line.
  src = fetchurl {
    url = "mirror://gnu/binutils/binutils-${version}.tar.bz2";
    sha256 = "028cklfqaab24glva1ks2aqa1zxa6w6xmc8q34zs1sb7h22dxspg";
  };
  configureFlags = "--target=avr --enable-languages=c,c++ --disable-werror";
  meta = with stdenv.lib; {
GCC needed a change to be able to find avrbinutils.
I glue it all together with a rather pedantic shell.nix.
    avrbinutils = import nixpkgs/avr/binutils {
        stdenv = pkgs.stdenv;
        fetchurl = pkgs.fetchurl;
    };
    avrgcc = import nixpkgs/avr/gcc {
        stdenv = pkgs.stdenv;
        fetchurl = pkgs.fetchurl;
        gmp = pkgs.gmp;
        mpfr = pkgs.mpfr;
        libmpc = pkgs.libmpc;
        zlib = pkgs.zlib;
        avrbinutils = avrbinutils;
        texinfo = pkgs.texinfo;
    };
    libc = import nixpkgs/avr/libc {
        stdenv = pkgs.stdenv;
        fetchurl = pkgs.fetchurl;
        avrgcc = avrgcc;
        avrbinutils = avrbinutils;
        automake = pkgs.automake;
        autoconf = pkgs.autoconf;
    };

    ...

    buildInputs = [
        avrbinutils
        avrgcc
        libc
        pkgs.avrdude
        ws2812.ws2812_avr
    ];
To get this working, I spent many hours trying to figure out why the libc libraries weren’t showing up in my path. I no longer remember searches that I used to find what I needed, but I eventually added a setup-hook.sh to my libc build. That script adds include paths and library paths to NIX_CFLAGS_COMPILE and NIX_LDFLAGS for each library directory under <libc>/avr/lib/.
I do not have a GCC wrapper working in my environment, so I had to modify my project Makefile to explicitely include these environment variables.
ALL_CFLAGS = -mmcu=$(MCU) -I. $(CFLAGS) $(NIX_CFLAGS_COMPILE) $(NIX_LDFLAGS)
I copied my base Makefile from the neopixel_i2c project, which I have used in previous experiments that involved an embedded Linux system.
One final element, the crtattiny85.o file, is missing. That file is found in in avrlibc hierarchy at <libc>/avr/lib/avr25/crtattiny85.o. I have no idea how the compiler knows that it wants that file in paricular, so I have not determined what environment variables I could use to tell the compiler where to find it. Instead, and somewhat out of laziness, I just copied the file into my working directory.
This gives me a working compiler!
If you want to use the environment, try pulling the shell.nix file and the avr directory. If you are not doing a neopixel project, you can leave out the ws2812 derivation, as that is a packaging of the library that handles neopixel signalling.
WS2812

WS2812 refers to the onboard controller that neopixels use. Neopixels may look like LEDs, but they are actually clusters of LEDs with their own processor and power distribution. The control protocol works by sending precisely timed signals down the wire, one trio of signals per pixel, followed by a long time at logical 0. Each pixel captures the first three signals it receives and sends all remaining signals down the wire until the long logical 0 indicates that the entire message is done.
The neopixel ws2812 library includes clever assembly code that implements the timing based on an 800kHz clock.
I first worked with the library as I was learning to work with the neopixel_i2c library. However, I did not want to use git submodules. Instead, I decided to package this as a Nix derivation, including any patches that I wanted to include.
In this case, I had to build the derivation from scratch as I had no template to start with. Fortunately, I have the hang of building libraries, but I still provide a setup-hook file to set a convenient WS2812_PATH environment variable and a patch to the Makefile to depend on NIX_CFLAGS_COMPILE and NIX_LDFLAGS.
My derivation file provides both light-ws2812-source and the ws2812_avr library as separate derivations. The library actually provides code for multiple environments, but ws2812_avr is the only one I currently build.
While this is a “library”, it is unusual in the same way as libc in that my only target is a .o file, not a .so or .a. Like with the crtattiny85.o file, I manually copy the light_ws2812.o file into my project.
Some Hardware
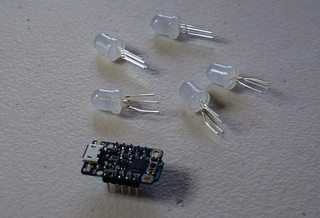
This is where the fun happens. For this project, I have:
- a generic breadboard
- an Adafruit Trinket, which is a nice packaging of an attiny85 with a USB bootloader
- five 8mm through-hole diffused pixels
- a bunch of pin-to-pin jumper wires
- one microUSB cable
- an external USB battery
I have standardized my wire colors on this project as RED for 5V power, BLUE for ground, and YELLOW for data. Since Neopixels are 5V driven, I made sure to use a 5V Trinket. Watch out for that, as I don’t know what would happen if you tried to use a 3.3V trinket with the pixels.
The Trinket accepts main power on the USB wire. The underside of the Trinket has pads to which one could attach incoming power, also. Importantly, the 5V pin and the GND pin on he sides of Trinket are for the Trinket to provide power to any attached hardware, not for the Trinket to receive power. Fortunately, I did not destroy anything before I understood this.

I use Pin #3 on the Trinket as the data line. This pin number is hard-coded in the ws2812 library. You can change it by patching ws2812_pin in ws2812_config.h. If you wanted to do this, I recommend a patch that you provide in the patches phase of your derivation.
On this project I have only the single yellow wire because I carefully ensured that the data pins chain to one another. These particular pixels made that convenient by putting the data in and data out pins on the edge of the pixels with the power pins in the center.
The wiring is important. When you power the Trinket on for the first time, keep a finger near it and pull power as fast as you can if you feel heat. I made a mistake in my wire colors at first and accidentally shorted the Trinket’s power to ground. Fortunately, I noticed and pulled power before anything exploded.
When you apply power, all of the pixels will go to a random state while the Trinket boots up. While I don’t know the details of how to fix that, I suspect a pull-down resistor on the data line would help.
After a few seconds, though, the Trinket will start running the program. In my case, the program just runs forever, transitioning from one pride flag to the next in a loop. I get visible flicker in the pixels, which I suspect I could alleviate with capacitors on the inputs. Some folks have recommended 1uF capacitors, but said that 10uF, while overkill, would do the job.
Programming
Brush up your C, as this is low-level programming. Nevertheless, it is an odd combination of fun and frustrating. Remember, you have no debugging tools on the Trinket.
ws2812 provides a cRGB convenience data structure and a function, ws2812_setleds function which accepts a struct cRGB *ledarray. I had not done any C programming in quite a long time, so I completely missed that struct cRGB *ledarray is a standard C way of describing struct cRGB ledarray[x], where x is unknown. This means a single contiguous block of data, one cRGB after another.
Until I figured that out, I wrote all kinds of wrong code that mostly amounted to creating arrays of pointers to cRGB structures. Now, I create my pride flags as normal cRGB arrays, and happily pass them around as struct cRGB *.
const struct cRGB genderqueer_flag[LED_COUNT * 3] = {
    { .r = 128, .g = 0,     .b = 128 },
    { .r = 128, .g = 0,     .b = 128 },
    { .r = 128, .g = 128,   .b = 128 },
    { .r = 0,   .g = 128,   .b = 0 },
    { .r = 0,   .g = 128,   .b = 0 }
};
I wrote so many bugs that trial and error was insufficient, so I wrote in some conditional compilation logic that lets me run my application directly on my host machine. For the neopixel project, I needed in particular to provide my own _delay_ms function, declarations for uint8_t and uint16_t, and wrapper for ws2812_setleds. At the top of my program I have a conditional compilation block for initial declarations:
#if __HOST__
/* headers for the host machine */

typedef unsigned char uint8_t;
struct cRGB { uint8_t g; uint8_t r; uint8_t b; };

void _delay_ms(double ms) {
    int ms_int = round(ms);
    struct timeval delay = { .tv_sec = ms_int / 1000, .tv_usec = (ms_int % 1000) * 1000000 };
    select(0, NULL, NULL, NULL, &delay);
}

#define uint8_t unsigned char
#define uint16_t unsigned short
#else
/* headers for the AVR */
#endif
In the body of my code, I provide write_leds as a wrapper around ws2812_setleds, though I realize now that I could have simply redeclared ws2812_setleds in the __HOST__ block at the start of the application.
void write_leds(const struct cRGB *leds, uint16_t count) {
#if __HOST__
    for (int i = 0; i < count; i++) {
        printf("\t{ %d, %d, %d }\n", leds[i].r, leds[i].g, leds[i].b);
    }
#else
    ws2812_setleds((struct cRGB *)leds, count);
#endif
}
The main body of my code is a simple state machine that I modeled as a machine that is either RESTING on a particular pattern or TRANSITIONING to another pattern. When transitioning I do a simple interpolation between my starting pattern and my ending pattern, so I am able to base the “current” pattern solely on the start, end, current frame number, and total number of frames.
struct state_s {
    uint8_t current;
    uint8_t frame_count;

    const struct cRGB *start;
    const struct cRGB *end;
};
uint8_t interpolate_color (uint8_t start, uint8_t end, uint8_t frame_count) {
    uint8_t res = start + ((end - start) / TRANSITION_FRAMES * (frame_count + 1));
    return res;
}
Finally, my state machine block is rather straightforward:
        switch (state.current) {
            case RESTING:
                _delay_ms(REST_TIME_MS);
                state.current = TRANSITIONING;
                break;
            case TRANSITIONING:
                if (state.frame_count < TRANSITION_FRAMES) {
                    /* code to calculate write the current pattern */
                    state.frame_count = state.frame_count + 1;
                    _delay_ms(TRANSITION_TIME_MS / TRANSITION_FRAMES);
                } else {
                    state.current = RESTING;
                }
                break;
        }
Glue it all together and I get a program that displays a pattern for five seconds, then fades to the next one over the course of five seconds.
Program Loading
The final step to actually try out all of the work is to flash the program onto the chip. My Makefile provides a main.hex file, which is the AVR image to be sent to the controller. I use avrdude to do the programming. I include in my repository a Trinket-friendly, macOS version of avrdude.conf.
Every time I try programming, I have to do it twice in a row. The first time always fails with a checksum error, and the second time succeeds. I have no idea why this happens, but I made a script that does it for me:
avrdude -c usbtiny -p attiny85 -U flash:w:main.hex
sleep 5
avrdude -c usbtiny -p attiny85 -D -U flash:w:main.hex
Note that the two avrdude commands differ. Just issuing the command with -D gives me one checksum error. Issuing the command with the -D gives a different checksum error. Issuing the two commands in this order… just works? Let me know if you know why and especially if you can tell me the correct way of running the command.
Making sure to use a data cable, plug the Trinket into a USB port. The Trinket seems to automatically go into programming mode if it detects a data cable, so just run the script above. When the programming is done, the Trinket should immediately start running the application!
More things!
I still have more that I want to do. I want to get an RGB pixel jewel and wrap it into a wearable form. I want to add a bisexual pride flag. And I want to show it off!
And then I want to start on my Halloween costume. I have a Lapis Lazuli costume that I have wanted to make for years, and now I can add lights into the design. When I do this costume, instead of using a Trinket I want to drop down to a bare AtTiny85 so I can make the electronics as compact as possible.
But more than this, I want to do more work based on a Beagle Bone or other embedded Linux platform so I can use the i2c bus to link together sensors and lights with some logic. I have already done experiments with this and I am looking forward to figuring out how to mount sensors and lights on a piece of clothing.