Luminescent Dreams

Stealing an Oilcrow Egg

October 04, 2025

Last weekend, I ran a heist in the Wildsea. Wildsea is a game that was new to all of us, so while we had read the books, we were going in with very open expectations.

As the Firefly (the GM for Wildsea) for this session, and with us intending for the game to be a one-shot, I applied many of my design principles for one-shots, however I also faced several challenges. In this article, I’m going to present the scenario in its basic mechanical form, the challenges that I faced when designing a scenario for this system, and an action report from the scenario.

In the end, the job that this crew was doing was successful, all of the players had a great time, and now we’re going to have a continuing campaign with a rotation of players and GMs.

Some notes about the Wildsea

Wildsea envisions a post-apocalyptic world in which a mutagenic chemical caused plant growth accelarated to the point that plants and trees overran all of civilization. Most of the game occurs in the treetops, miles above ground level. Descendents of the survivors of the apocalypse live on mountaintops, chunks of land pushed up to the treetops, and on “ships” designed to travel across the treetops.

Relevant to this session is that ships have two distinct methods of locomotion. Many of these involved cutting through the treetops with huge chainsaws that both cut the branches and pull the ship forward. The other, more expensive methods, use “legs” to crawl across the top. These methods generally leave less of a track to follow, and that ended up being relevant with my players.

Mechanically, this is a D6-pool game in which players take the highest result. Like in Forged in the Dark games, a 6 is a full success, a 4 or 5 is a partial success or success with a consequence, and a 1-3 is a failure. Many challenges are resolved through a single dice roll, with “tracks” (or “progress clocks”) for managing longer challenges. Combat against an adversary, or an attempt to evade an adversary, will be via a track instead of through a hit point based system.

The Job

Steal an Oilcrow egg. No small task.

For one thing, until you saw this job posted on the job board, nobody knew that the Oilcrow even laid eggs. One wouldn’t expect that from a creature so thoroughly contaminated, but somebody sure did expect it and was willing to pay well.

For another, an Oilcrow nest would be about the most crezzarine-contaminated places in the Thrash. Plus, there’s the Oilcrow itself. If the crezzarine hadn’t killed that thing already, nothing could, and trying was just another word for “deathwish”.

This is a two-phase scenario, the Heist and the Flight. The results of the Heist section mechanically affect some elements of the Flight section. Be sure to include any additional effects that you feel are appropriate.

In the Heist, the players will need to find a way to get to the nest to retrieve the egg. They will be dealing with several threats which seem thematic for an Oilcrow. For this, I decided:

  • Crezzarine and oil deposits
  • Nests of manticrows
  • The danger of falling through the treetops

I assigned a six point track for this phase of the operation, with the understanding that I would distribute the points of the track according to the strategy that the players decided to take, and that there would be ways to complete the mission without filling the entire track.

Against this track was another track for the Oilcrow’s return. For this, I set up a three point track and decided that it would fill during particularly disastrous rolls, and at the milestone of actually retrieving the egg.

We move into the Flight phase. This uses the Journey rules as outlined in the book. I this case, the players are trying to get far enough away that the Oilcrow cannot track them. I assigned a five point track for the flight, and I added three points to the existing Oilcrow track. Again, the Oilcrow track would fill for particularly disastrous rolls, but also for times when the team slowed down.

I set up several possible encounters for this section:

  • blanched waves
  • a rift
  • Another ship, this one travelling ahead of an impending storm
  • a pangoska flock
  • a pack of pinwolves

This is the complete set of preparation work that I did before going into the scenario:

  • Heist section: six points to be spread across progress tracks
    • Oilcrow: leviathan-class threat. 20+ progress track. Slick Feathers, Concentrated Crezzerblight, Wingless, After-Effects
    • Manticrows: Feather and Beak, Crow Oil, Ragged Flight, Mutative
    • The Oilcrow returns: 3 point track
  • Flight section:
    • Five point track to escape the Oilcrow
    • Add 3 points to the Oilcrow Returns track
    • Blanced Waves
    • Rift
    • Another boat, travelling ahead of a storm
    • Pangoska flock
    • Pack of Pinwolves
    • A shipwreck with potential salvage

The Real Run

We started near the Oilcrow nest at a time in which the Oilcrow had left the nest. The players decided to split the party, with half staying on the ship to keep the Manticrows busy, and the other half going into the canopy to try sneak past them. For this, I set up two separate progress tracks, dividing the six points between them:

  • Retrieve the egg: 2 points to reach the egg, 1 point to return
  • Distract the manticrows: 3 points

I put in the additional rule that the “Distract the manticrows” track needed to stay even with or ahead of the “Retrieve the egg” track, and then we alternated between the teams, giving both chances to advance their tracks.

I had no clear rules for when to advance the “Oilcrow Returns” track other than getting to the egg itself and “whenever felt right”. Getting caught would have been disastrous for the crow, but also the Oilcrow is a large creature that I felt it was reasonable for them to track, so I made this track public.

I alternated between the two teams, first giving the ship team some time to take their actions. The on-ship team first distracted the Manticrows, effectively causing the entire flock to focus on and descend upon the ship. Then, the Tempest crewmember used a well-placed lightning strike and a very good roll to disable the entire flock. I advanced “The Oilcrow Returns” track due to the thunderclap, but this also meant that the away team had only to deal with movement hazards.

The away team had several difficulties, but were able to make their way to the nest with several complications. They took some minor injuries as branches broke, but they rolled well enough to find a path that had avoided oil and crezzarine contamination. Once at the nest, and with the Manticrows dispatched, they were able to wave the ship over and were able to load the egg onto the ship directly.

Now we transitioned to the flight away from the nest. Because the crew had built their ship to crawl across the treetops, giving them an advantage to stealth, I extended the Oilcrow track even further to represent the difficulty of tracking the ship.

The players opted to travel at high speed. This gives the advantage of covering a lot of ground very quickly, but the disadvantage that they could not avoid any encounters they came across.

Thee first encounter was an area of Blanched Waves, tree branches sapped of life and made so brittle that they could not hold up the weight of a ship. The ship’s watchperson noticed only moments before the branches began collapsing under the ship. The crew was able to resolve it by using a Whisper (a one-shot magical effect) to trigger a blossom of growth that grew quickly enough to hold their ship aloft and to give them passage. Had they not been able to resolve it so quickly, I would have had the ship fall deep into the canopy where they would have taken damage to the ship, needed to find their way out, and would have needed to deal with some dangerous creatures.

Moving on, they opted to travel quickly again, and so were moving too quickly to avoid the Rift (a significant gap in the canopy) until they tipped into it. The watchperson was flung out into the rift but was able to use her grappling hook to remain attached to the ship and avoid falling further. The two at the helm were able to stay just barely enough in control to remain on the ship and also activate the ship’s cargo crane to grabbed nearby trees and arrest the ship’s fall. Secretly, I had rolled on the threat die that this encounter was dangerous, but also included the chance for something interesting to happen. I played this out by having the watchperson, dangling out in the open, spot sight of a shipwreck in the trees. The crew opted to take some time to salvage the wreck.

This scene was entirely improvised. In the salvage operation, I decided to have each of the three conduct a single roll to see what they could find, and then riffed off of the results. The Surgeon of the crew found a damaged anatomy book. The Dredger found a bunch of ship parts that they were able to move over to use for future repairs. The Horizoneer, who had been on watch when the ship tipped into the Rift, found the journal of the Horizoneer of the wrecked ship, and from that journal took a bit of psychic harm, but also a new Whisper.

At this point, the crew’s high speed and the stealthiness of the ship’s drive meant that they had sufficient lead on the Oilcrow that they completed the last point of their trip at a sedate pace, and they were able to avoid any additional encounters.

Final Advice

It is not possible to fully prepare a session. While this is technically true of any RPG with a random element, but generative dice systems such as Forged in the Dark and Powered by the Apocalypse push this prominently to the forefront. Something happens in every roll, because there is no such thing as a roll in which nothing happens.

As such, here is my advice for planning a session.

Decide on an outline of the session, the main story beats, including branches for cases in which the dice go very wrong or the players make a very different choice. In this mission, there were few possible branches, so I just outlined the two main phases and made sure that I had a contingency plan for if they ended up facing the Oilcrow.

Create a menu of encounters and pick from them as it makes sense to do so. Don’t go into extreme detail on each of them, but deciding on the general theme would be good.

Include the players in the improv. These styles of games openly say in the book that, when you are lacking in ideas, you should ask the players at the table for their own ideas. Do that here. You can take their ideas exactly as they suggest, but often they will suggest paths that will unblock your own thinking.

Now, go off and run some Wildsea!


Aurora

October 01, 2025

Since the spectacular photos of aurora from 2003, I have held a constant, enduring, desire to see the aurora myself.

Finally, in October of 2024, I finally got the chance. I drove out to a darker area near Providence, and found a bridge where many other people had the same idea. Finding a place to park and pull out my camera, I found a lot of other people who had already set up to take pictures from the bridge.

In the past, some people have told me that I would not be able to see the aurora myself. That the aurora was so dim as to be largely invisible to human eyes. I was happy to say that was not the case, and as the night progressed I could see the structure in the lights.

Bucket list item complete. And I hope to complete it again and again.

The Mystery of the Bad Data Line

September 19, 2025

Today, I want to tell you a story of diagnostics, and a solution to a bug that made me understand a bit more about how electricity works.

I had a strand of individually addressible LEDs which unexpectedly stopped working. As I moved from breadboard with jumper cables to a soldered circuit board, the color patterns that I had programmed into the LEDs were suddenly replaced with solid white at maximum brightness.

A long-running project

Two years ago, I concieved of a project of a set of decorative safety lights on my bike. While running normally, they show one of the color patterns that I programmed in. However, I also have handlebar buttons that activate a blinker patterns, and magnetic sensors on the brake handles that activate a solid red brake light.

I spent about three days programming the project, covering the core logic, a GUI simulator that let me work out all of the animations on my desktop, and the program that could run on the hardware.

Implementing the hardware circuits took quite a bit longer, but I was able to attach the project to my bike and take it to the Providence Bike Jam.

After a few bike rides, vibration broke some of the solder joins. I took this as an opportunity to redesign the circuit board. This process went well until I encountered this bug.

The Bug

As I said before, this bug manifested while I was moving from breadboard to soldered circuit board. Before I soldered the last component into place, the lights all showed the colors I expected them to. Once I was done soldering the component into place, the lights simply showed solid white and maximum brightness. I did some diagnostics to ensure that I had not introduced a short or crossed wires, but eventually could make no further progress and set the project aside for a time.

When I later returned with a fresh mind to the project, I pulled out the oscilloscope and began diagnosing in a systematic way. I checked the voltages on all of the power lines, then I connected to the data line and the clock line. Here I could see that whenever the clock signal appeared on the clock line, the data signal would go high and remain there for the duration of the transaction.

Now, here is where I made a mistake. I went back to inspecting my code on the computer. I read data sheets, looked at SPI protocol modes, and was back to second-guessing myself. But this was the wrong thing to do, because everything worked correctly until I moved to the soldered board.

So, I went back to the board and the oscilloscope. For the next step to make sense, I need to clarify something.

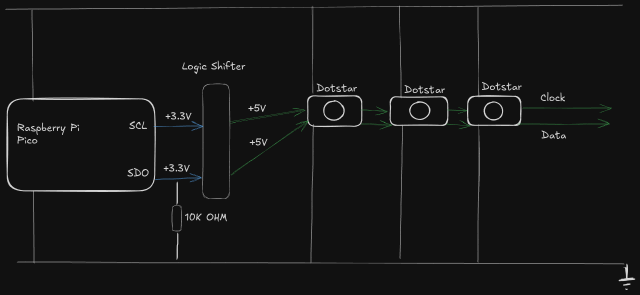
The addressable lights that I use require a 5 volt signal, while the Raspberry Pi Pico has been built for 3.3 volt signals. I have a Logic Shifter chip on this board which converts from a 3.3 volt signal to a 5 volt signal. When I say that I was probing the data line, what I was really doing was looking at the 5 volt segment of the data line. When I moved my probes to the 3.3 volt segment, the segment which connects the Pico to the Logic Shifter, the lights suddenly began working perfectly again. I moved the probes back to the 5 volt segment and again, the lights went back to solid white.

My final test was to attach probes to both the 5 volt segment and the 3.3 volt segment simultaneously and observe the signal. Once I could see clearly that the two segments carried the same data signal, I then removed the probe from the 3.3 volt segment. Immediately the 5 volt segment reverted to the broken behavior.

This is when I realized that the pull-down resistor built into the Pico must have failed. The Pico would emit a 3.3 volt signal, but without that pull-down resistor there was nothing to pull the signal back to 0. Thus, the Logic Shifter continues to read a logical 1 on the 3.3 volt segment, and thus it sends a logical 1 on the 5 volt segment. The oscilloscope itself now functioned as a pull-down resistor when I had a probe attached to the 3.3 volt segment.

Once I understood this, the solution became simple: connect a resistor between the 3.3 volt segment and ground.

When I was building the eight-bit computer project, I had to come to grips with tri-state logic. This is not trinary, but something subtly different which applies to physical wires.

For purposes of a digital signal, a wire can be in one of three states: High, Low, and Floating. When attached to the voltage source, the wire is High and this indicates a binary 1. When attached to ground, the wire is Low and this indicates a zero. But when not attached to either, the wire has no particular state. Computer circuits are designed with this in mind, and carefully timed to ensure that circuits don’t try to read a floating line.

Pull-Down resistors get involved when you want to ensure that the signal is, by default, Low. Their function is to drain current from a wire, but still allow a microcontroller to drive current into the wire to create a logical 1. If you were to think of this in terms of water and pipes, you can put water into the pipe to make it appear full. The drain lets some of the water out, but slowly enough that detectors will still read the pipe as full. This way, when you stop pushing water into the pipe, the drain will empyt the pipe without you taking any further action.

This holds true for electrical circuits as well. Voltage sensors will, by nature, drain a bit of power out of a wire that has been driven to a High signal, but generally not enough to drain the power back down to a Low signal. When I configure the Raspberry Pi Pico to treat a wire as a digital I/O wire, one of the configuration options that I set is to include this pull-down resistor so that the Pi has to only decide when to push current into the wire.

When the resistor on the Pico failed, there was no longer any mechanism to return a 3.3 volt signal back to 0 volts.

Conclusion

I had a few lessons here.

The water analogy for electricity can sometimes mislead one, but we are still pushing a fluid of electrons into a wire. They need some place to go, or anything else in the system is going to forever read that wire as being in the high voltage state.

Second, use the tools at hand, in this case a multimeter and an oscilloscope, to systematically gather data. Review what is there, and if necessary, form a hypothesis and gather more data. Electricity is logical at the scale of hobbyist digital electronics.

I still have a long way to go. The hardest part of this has never been the logic and the programming, but the challenges of attaching the control board and the handlebar buttons to my bike. Nevertheless, I persist, and I understand just a little bit more than I have in the past.

Sun and Moon

September 10, 2025
  • Luminance HDR 2.6.1.1Tonemapping parameters:Operator: FattalParameters:Alpha: 1Beta: 0.9Color Saturation: 1.5 Noise Reduction: 0 ------PreGamma: 1
  • August, 18, 2024

I ran across this in Maryland in August of 2024. The particular city I was visiting had a beautiful riverwalk with several footbridges across it. This clock was attached to the side of one of those footbridges.

Home Music Player with a Raspberry Pi

September 05, 2025

(image source)

Long ago, my houshold had a home audio system that consisted of multiple components hooked together and then plugged into some speakers. Our system consisted of a Marantz receiver and audio router, a THX-certified 5-channel amplifier, a couple of 4-foot-tall speakers, and a CD player. We also hooked our tiny little 13" TV into this so that even though our screen was small, the sound was magnificent.

I appreciate really good audio, but she was the one who really felt the benefits of it. As a musician, she could hear all of the subtleties and nuances. She was proud of her system being able to resolve the lowest of the low pitches from Also sprach Zarathustra. During the divorce, that system went with the person who could appreciate it.

Nowadays, we don’t see these systems too much. Our music collections have grown, music streaming has become a big deal, and it became really impractical to be able to manage all of that and get it routed to the Stereo System. I remember when I would move my laptop to the living room, set it precariously atop the speaker, run an audio wire to the receiver, and then use both hands to navigate an audio collection. CD players, tape decks, and turntables disappeared.

As these legacy mechanisms for managing our became impractical and went away, we didn’t get satisfying replacements for our modern systems. Now, if you want a stereo setup that is dedicated to just music, you generally have to go with some proprietary system made my Sonos or Apple.

Unless you lean in to Open Source.

Today, all of my music is sitting on a Raspberry Pi 4, plugged into speaker system, and running a piece of software called the Music Player Daemon. Let’s talk about how all of this works.

The Music Player

  • August, 14, 2025
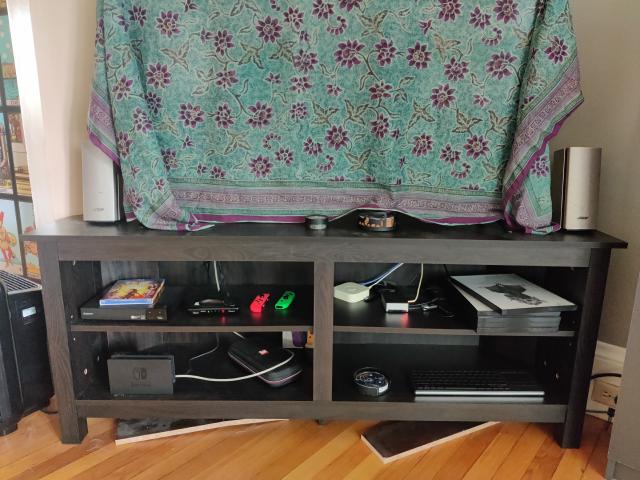
This is my living room setup today. The Raspberry Pi is visible there, but very nondescript. The speakers flank the television. I have a volume control sitting, subtly, right there in front of the TV. It’s all nearly invisible. And unlike in my younger days, it has hundreds of “cds” available at the drop of a hat, even albums that I never owned as a physical disk.

A Raspberry Pi isn’t necessary. Any Linux-running machine is possible. If you want, you could set up an old laptop there and possibly configure a graphic visualizer to go along with the music. The emphasis here is on No User Interface.

Here’s the setup:

  • Raspberry Pi 4
  • 256GB USB Sata disk
  • Bose desktop speakers

MPD is the heart of this. The Music Player Daemon plays music, generally from files on the local disk, to the Raspberry Pi’s sound system. You control it through the network. Some things you can do with it:

  • Browse your entire music collection, including album art
  • Create and edit playlists
  • Send completely separate playlists to multiple speakers throughout the house

Wait a second, no UI?

MPD does not provide a user interface. It only provides a network connection. So you will need the second part of this picture: The Client.

The Client is any application which can connect to MPD via the network. MPD follows a very well-documented protocol, which has lead to there being dozens of clients, matching many different aesthetics and some distinctly different use cases. The Client is a remote control, not a playback device, so everything you are doing is controlling the MPD server.

As I’m walking around the house, I like to use the client M.A.L.P. on Android. It’s available on the Android app store, is free, and has absolutely no advertising. It looks just like any other music application on your phone. Once connected to the server, it shows the entire music collection that the server has, what is currently playing, and the current queue. I can select different music, replace the queue entirely, or jump to a random area of the song.

  • September, 07, 2025

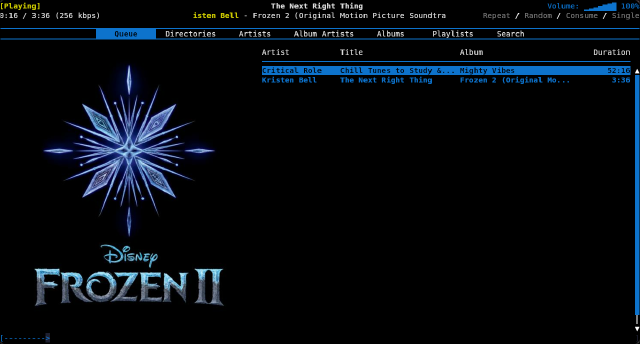
My second choice is a terminal-based application called rmpc. Despite being in the terminal, this is effectively a GUI which is very keyboard accessible. I like this because it is very comfortable for me while I’m sitting at my desk.

Setting up the server

MPD is pretty easy to set up, but it will vary a little bit based on your system. There are very few settings, but there is one which can cause trouble. Let’s talk two different scenarios.

Let’s say you want a setup like what I have above. This is a standard “headless” setup, meaing that there is no monitor or user interface directly on the system. In this setup, there is typically nobody logged in. This has some impact on the system because Pipewire won’t be running.

In case you don’t know, Pipewire is software that takes control of the sound system on Linux and then allows multiple applications to play back music at the same time. Without Pipewire, only one application at a time can access your sound system. The trick is that Pipewire is very difficult to start outside of a GUI environment.

Since you don’t have Pipewire, you should configure MPD to use Alsa to communicate directly to the hardware on the Raspberry Pi.

audio_output {
  type "alsa"
  name "Sound card"
  device "hw:0,0"
}
mixer_type "software"

The device for my Raspbery Pi is hw:0,0. I don’t know what this means, but I do imagine that it will be the same for all other Raspberry Pi 4s.

This will be different for a multi-user system like your desktop machine. If you are installing in that scenario, you will likely not need to do any configuration at all.

For your last step, make sure you open your firewall. MPD typically listens to TCP port 6600 on all interfaces. If you want to control your media remotely, be sure to add allow incoming TCP connections from that. However be aware of the security implications of this. It is best to not allow remote connections to a machine, such as a laptop, that you will be taking out of the house.


And now, you are ready to go. Select your favorite MPD client, connect to the server, and start playing some music.

Have fun!